tinyboot docs
Documentation for using, integrating, and extending tinyboot.
If you’re new here, start with the top-level README quick start, then come back for deeper topics.
Tutorial
- Getting Started — toolchain, tools, and your first successful flash
Guides
- Flash modes: system-flash vs user-flash
- Transports: UART, RS-485, DXL TTL
- GPIO-controlled boot mode selection — BOOT0 circuits for chips with hardware boot pins
- App integration — wire the tinyboot app side into your firmware
- Remote firmware updates — the end-to-end OTA flow
- Building your bootloader from an example
Reference
- Porting to a new MCU family
- Adding a new chip series
- Design notes — motivation, the 1920-byte budget, unsafe policy
- Protocol reference — wire format, frames, commands
- Boot state machine — state transitions, metadata layout
- CLI reference
tinyboot-ch32reference
Troubleshooting
- Troubleshooting guide — symptoms, likely causes, fixes
Contributing
- Contributing — dev setup, tests, hardware validation
Getting started
A walkthrough for flashing the tinyboot bootloader + a demo app onto a CH32V003, then updating the app over UART. This is the expanded version of the top-level README quick start, with more detail on each step and notes for the other supported chips.
What you’ll need
- A CH32V003 board (e.g. the CH32V003F4P6-R0 dev board, or a custom board). This guide uses PD5/PD6 for UART, which is the factory default.
- A WCH-LinkE programmer (for SWIO / one-wire debug) or equivalent wlink-supported probe.
- A USB-UART adapter wired to the MCU’s UART pins (TX → RX, RX → TX, GND shared). For RS-485 / DXL TTL, see the transports guide.
If you’re on a different chip (CH32V00x or CH32V103), the steps are the same — just swap the example directory. See the chip notes below.
1. Install tools
# Rust nightly with the RISC-V target the examples use
rustup toolchain install nightly
rustup component add rust-src --toolchain nightly

# WCH programming tool (flashes over WCH-LinkE)
cargo install wlink

# The tinyboot host CLI
cargo install tinyboot
The CH32V003 examples use riscv32ec-unknown-none-elf, which is a Tier 3 target that -Zbuild-std builds on the fly — nightly is required. CH32V103 examples use the stable riscv32imc-unknown-none-elf target.
2. Clone the repo
git clone https://github.com/OpenServoCore/tinyboot
cd tinyboot
3. Build and flash the bootloader
cd examples/ch32/v003/boot
cargo build --release
wlink flash --address 0x1FFFF000 target/riscv32ec-unknown-none-elf/release/boot
Important
After flashing system flash, power-cycle the board before continuing — a software reset is not sufficient to switch the CPU over to the new bootloader on some chips. The easiest way is
wlink set-power disable3v3 && wlink set-power enable3v3.
At this point the chip runs the bootloader at power-on. With no valid app in user flash, it will sit and wait for a host.
4. Build the demo app
cd ../app
cargo build --release
This produces an ELF at target/riscv32ec-unknown-none-elf/release/app.
5. Flash the app over UART
Connect your USB-UART adapter to the MCU’s UART pins, then:
tinyboot flash target/riscv32ec-unknown-none-elf/release/app --reset
--reset tells the bootloader to jump into the app once the flash and verify steps succeed. You should see the LED blink (TIM2-driven, ~1 Hz) — that’s the app running.
If --port is omitted, the CLI probes USB serial ports by sending an Info request to each. If auto-detection fails, pass --port /dev/ttyUSB0 (or the equivalent on your OS).
6. Verify it worked
tinyboot info
You should see something like:
capacity: 16320
erase_size: 64
boot_version: 0.4.0
app_version: 1.2.3
mode: 1
mode: 1 means the app is running. mode: 0 would mean the bootloader is running — you can switch the device into bootloader mode at any time:
tinyboot reset --bootloader
Next steps
- App integration — how to wire
poll()andconfirm()into your own app - Remote firmware updates — the end-to-end OTA flow
- Flash modes — system-flash vs user-flash tradeoffs
- Transports — RS-485, DXL TTL, alternate pins and baud rates
- Troubleshooting — if something above didn’t work
Chip notes
CH32V003 (this guide)
- System flash:
0x1FFFF000, 1920 bytes. - User flash: 16 KB, minus the last 64-byte META page.
- No BOOT_CTL circuit needed.
CH32V00x (V002 / V004 / V005 / V006 / V007)
- System flash:
0x1FFF0000, 3 KB + 256 B. - Example directory:
examples/ch32/v00x/. wlinkauto-detects V006 / V007 together — this is expected.
CH32V103
- System flash:
0x1FFFF000, 2048 bytes. - Example directory:
examples/ch32/v103/. - Requires an external BOOT_CTL circuit to switch between system flash (bootloader) and user flash (app) across a reset. See GPIO-controlled boot mode selection.
- The example uses
BootCtl::new(Pin::PB1, Level::High, 8000)— adjust to your pin and RC timing.
Flash modes: system-flash vs user-flash
CH32 parts have two regions of on-chip flash:
- System flash — a small region at
0x1FFF_xxxx, normally containing the factory ISP bootloader. On CH32, this region is writable viawlinkand can host tinyboot. - User flash — the main application flash starting at
0x0800_0000, mapped to0x0000_0000at execution.
tinyboot supports running from either region on every supported chip. This page explains the tradeoffs.
Quick recommendation
- Default to
system-flashwhen your chip can switch boot source in software. The entire user flash stays available for your application. - Use
user-flashif you’d rather avoid the BOOT_CTL circuit some chips need for system-flash, or keep the factory ISP in place for easier recovery.
Picking a mode is controlled by a Cargo feature on your boot crate — the app crate doesn’t need to know.
Mode capacities
| Chip series | System flash size | User flash size | System-flash mode | User-flash mode |
|---|---|---|---|---|
| CH32V003 | 1920 B | 16 KB | ✅ Supported | ✅ Supported |
| CH32V00x | 3 KB + 256 B | 16–64 KB | ✅ Supported | ✅ Supported |
| CH32V103 | 2 KB (+ 1.75 KB split) | 32–64 KB | ✅ Supported | ✅ Supported |
Note
Chips that can’t switch boot source via a software MODE register need an external BOOT_CTL circuit for system-flash mode — see boot-ctl.md. Among supported chips, this currently applies to CH32V103. V003 / V00x switch boot source in software and need no extra hardware.
Note
CH32V103 split system flash: option bytes sit in the middle of system flash, splitting it into a 2 KB primary region at
0x1FFFF000and a 1.75 KB secondary region at0x1FFFF900. V103 system-flashmemory.xdeclares both asBOOT/BOOT2(with matchingCODE/CODE2execution mirrors) so the linker can spill overflow into the secondary region if needed.
What’s in each region
Regardless of mode, every tinyboot layout reserves four regions, named in memory.x:
| Region | Role | Where it lives |
|---|---|---|
BOOT | Bootloader code | System flash (system-flash mode) or top/bottom of user flash (user-flash mode) |
APP | Application code | User flash |
META | Boot metadata (state, trials, CRC) | Last page of user flash |
CODE | Execution mirror (VMA) of BOOT | Usually 0x0000_0000 for boot, 0x0000_0000 + offset for app |
The META page is always in user flash, even in system-flash mode — it needs to be on a page boundary that matches the chip’s erase granularity, and user flash is always present.
Choosing a mode
Choose system-flash if:
- You want all of user flash available for your app.
- You’re OK with the small extra wiring on chips that need a BOOT_CTL circuit (V103).
- You don’t mind that recovering from a bad bootloader requires
wlink+ a power cycle.
Choose user-flash if:
- You want the factory ISP left intact in system flash for easy recovery via
wchisp. - You want a uniform layout across a fleet where some chips don’t have BOOT_CTL wired.
- You want the bootloader recoverable the same way as the app (any probe, any SWD/JTAG).
Turning on a mode
The boot crate picks the mode via a Cargo feature:
[dependencies]
tinyboot-ch32 = { version = "0.4", features = ["ch32v003f4p6", "system-flash"] }
Drop system-flash to run the bootloader from user flash. The example boot crates expose system-flash and user-flash as mutually-exclusive features and pick the matching linker script at build time — copy that pattern if you want a single crate that builds both.
See examples/ch32/v003/boot/Cargo.toml and examples/ch32/v003/boot/memory_x/ for the full wiring.
Reverting to the factory bootloader
In user-flash mode — the factory ISP in system flash was never touched. Enter it the normal way for your chip (e.g. on V103, hold BOOT0 HIGH and BOOT1 LOW at reset, then use wchisp over UART).
In system-flash mode — tinyboot has overwritten the factory ISP. Factory images for the supported chips live in vendor/ in this repo; reflash them to system flash to restore:
wlink flash vendor/ch32v003-system-flash.bin   --address 0x1FFFF000
wlink flash vendor/ch32v006-system-flash.bin   --address 0x1FFF0000
# CH32V103 has split system flash — flash each region separately:
wlink flash vendor/ch32v103-system-flash-1.bin --address 0x1FFFF000
wlink flash vendor/ch32v103-system-flash-2.bin --address 0x1FFFF900
wlink set-power disable3v3 && wlink set-power enable3v3
See vendor/README.md for the file / address table.
In practice wlink over SWIO is the universal recovery tool — as long as the debug interface is reachable, you can reflash anything in either region regardless of mode.
Transports
The tinyboot protocol runs over any embedded_io::Read + Write stream. The CH32 implementation ships a USART transport configured via two independent axes:
duplex— controls the MCU’s pin arrangement.Full— separate RX and TX pins.Half— RX is muxed onto the TX pin; the MCU uses a single wire.
tx_en— optional direction pin for an external buffer (RS-485 transceiver, etc.). Independent ofduplex. Driven to the configuredtx_levelaround writes, to the inverse while idle / reading.
Combining these gives four useful setups. Pick whichever matches your board.
Setup 1: full-duplex UART (two wires)
Regular UART — separate TX and RX to the host.
#![allow(unused)]
fn main() {
Usart::new(&UsartConfig {
    duplex: Duplex::Full,
    tx_en: None,
    ..
});
}
rx_pull: Pull::Up if the RX line can float when the host is disconnected; Pull::None if an external pull-up is already present.
Setup 2: single-wire UART (MCU-level half duplex)
The MCU muxes RX onto the TX pin — one wire to the host, no external buffer. Useful when both ends speak half duplex directly (some probes, some DXL servo chains where the MCU is the sole driver on its segment).
#![allow(unused)]
fn main() {
Usart::new(&UsartConfig {
    duplex: Duplex::Half,
    tx_en: None,
    ..
});
}
Setup 3: full-duplex UART + external half-duplex buffer (RS-485 / DXL TTL)
This is the OpenServoCore hardware style: the MCU runs regular full-duplex UART to a hardware transceiver (MAX485, 74LVC2G241, etc.), and tx_en drives the transceiver’s direction pin so its output stage only drives the bus while the MCU is transmitting.
#![allow(unused)]
fn main() {
Usart::new(&UsartConfig {
    duplex: Duplex::Full,
    tx_en: Some(TxEnConfig {
        pin: Pin::PC2,
        tx_level: Level::High,   // level that puts the transceiver in TX mode
    }),
    ..
});
}
tx_level matches the transceiver’s direction-pin polarity:
- MAX485-style (DE active high, /RE active low, tied together):
tx_level: Level::High. - Inverted driver (e.g. some 74LVC2G241 layouts where the enable is active low):
tx_level: Level::Low.
Setup 4: single-wire UART + external buffer
MCU half-duplex (muxed RX/TX) and a direction-controlled external buffer. Valid if your board puts a buffer in front of the MCU’s single wire and still needs direction switching.
#![allow(unused)]
fn main() {
Usart::new(&UsartConfig {
    duplex: Duplex::Half,
    tx_en: Some(TxEnConfig { pin: Pin::PC2, tx_level: Level::High }),
    ..
});
}
What tx_en actually does
When configured, the driver toggles the direction pin around every frame:
- Before the first byte of a write, the pin goes to
tx_level. - After the UART has finished transmitting (USART TC flag asserted — the driver calls
usart::flushbefore releasing), the pin returns to the inverse oftx_level.
This keeps the transceiver in RX the rest of the time, so host bytes can reach the MCU’s RX pin without contention.
Baud rate
BaudRate covers the standard ladder from 9600 up to 3 Mbps: B9600, B19200, B38400, B57600, B115200, B230400, B460800, B500000, B921600, B1000000, B1500000, B2000000, B2500000, B3000000.
The achievable accuracy depends on pclk: the USART divisor is pclk / baud, so non-integer ratios accumulate framing error. For high baud rates you usually need to bump the core clock — e.g. the V00x example calls rcc::init_48mhz_hsi_pll() so PCLK = 48 MHz, which divides exactly to 3 Mbps. The CH32V003’s reset-default 8 MHz PCLK is fine up to ~115200 but not for the megabit rates.
Single-wire buses (DXL daisy chains, RS-485 segments)
On a single-wire bus where the host’s TX and RX are also tied to the data line — typical for DXL chains and most RS-485 hookups — the host hears its own request frame echoed back before the device replies. The shipped tinyboot CLI handles this automatically by skipping any frame whose status is Request (devices never reply with that status). No host-side configuration needed; just match the device’s baud and tx_en polarity.
Pin remaps
UsartMapping picks the AFIO remap and selects which physical pins carry TX / RX. Available mappings are codegen’d per chip — check the generated UsartMapping enum in tinyboot-ch32, and cross-reference against the USART / AFIO sections of your chip’s datasheet for the pin assignments.
In Duplex::Half, only the TX pin is used; the RX pin of the mapping is unused.
Matching the app side
The app’s USART configuration must match the bootloader’s:
- Same USART instance (e.g. USART1).
- Same pins / remap.
- Same baud rate.
- Same
duplexmode. - Same
tx_enpin andtx_level(if used).
If any of these differ, the app can still run — but it won’t be able to receive Reset or Info over the bus, so remote bootloader entry won’t work. See the app integration guide for the app-side wiring.
Custom transports
The protocol is transport-agnostic — it just needs a byte-oriented duplex stream. To implement your own (USB CDC, SPI, even a radio link), implement tinyboot_core::traits::Transport, which is just embedded_io::Read + Write. See the porting guide for the trait surface.
GPIO-Controlled Boot Mode Selection
Some MCUs (e.g. CH32V103) use hardware boot pins (BOOT0/BOOT1) to select the boot source at reset. If you choose to run tinyboot from system flash, you need BOOT0 to default HIGH on power-on (system flash), and provide a way for firmware to switch to user flash (BOOT0 LOW) across a reset.
This document describes two circuits for controlling BOOT0 from a single GPIO pin (BOOT_CTL). Both share the same firmware interface.
Note: BOOT1 is tied to GND in both circuits.
BOOT_CTL GPIO Truth Table
| BOOT_CTL | Effect |
|---|---|
| HIGH | Boots system flash (tinyboot) |
| LOW | Boots user flash (app) |
Circuit Option 1: RC (Recommended)
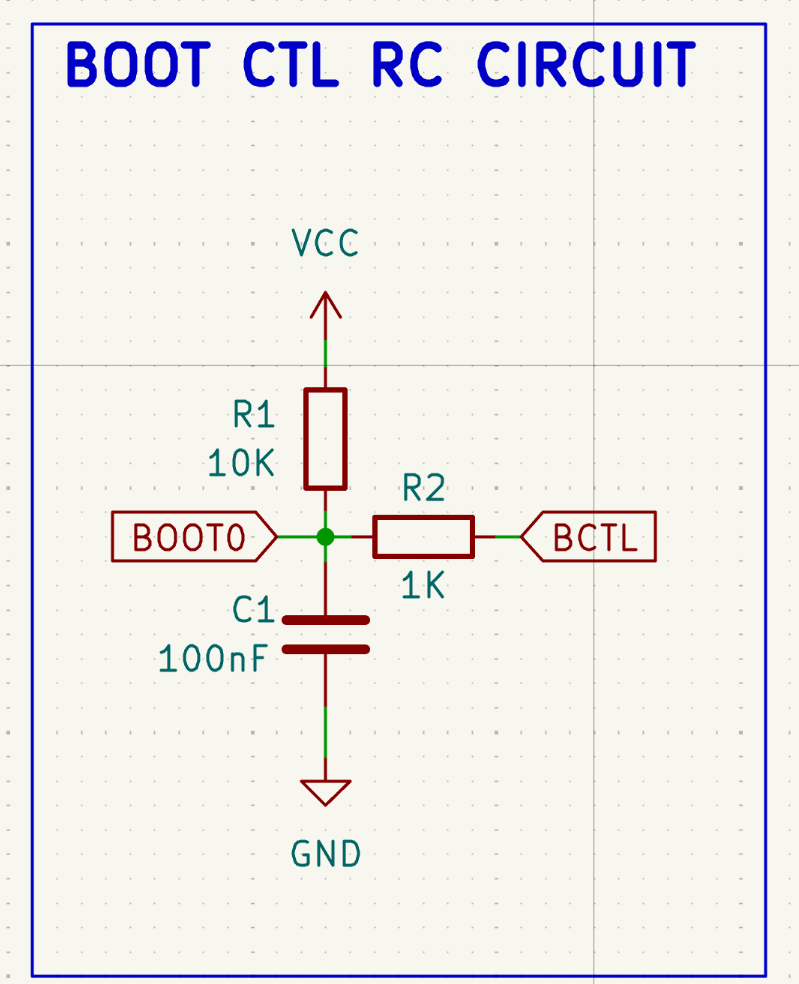
How it works:
- R1 (10K) pulls BOOT0 HIGH by default (system flash).
- When BOOT_CTL drives LOW, it overpowers the pull-up through R2 (1K), pulling BOOT0 LOW and discharging C1.
- On reset, the GPIO goes Hi-Z. The discharged capacitor holds BOOT0 LOW long enough for the chip to sample it (RC time constant = 10K x 100nF = 1ms).
- The capacitor then recharges through R1, returning BOOT0 to HIGH. On any subsequent reset, the chip boots back into system flash automatically.
Tested: Yes, verified on CH32V103C8T6. The RC time constant of 1ms provides sufficient hold time across a software-triggered system reset. The capacitor charges fast enough during power-on reset (POR) that BOOT0 reads HIGH on first boot.
Circuit Option 2: Flip-Flop
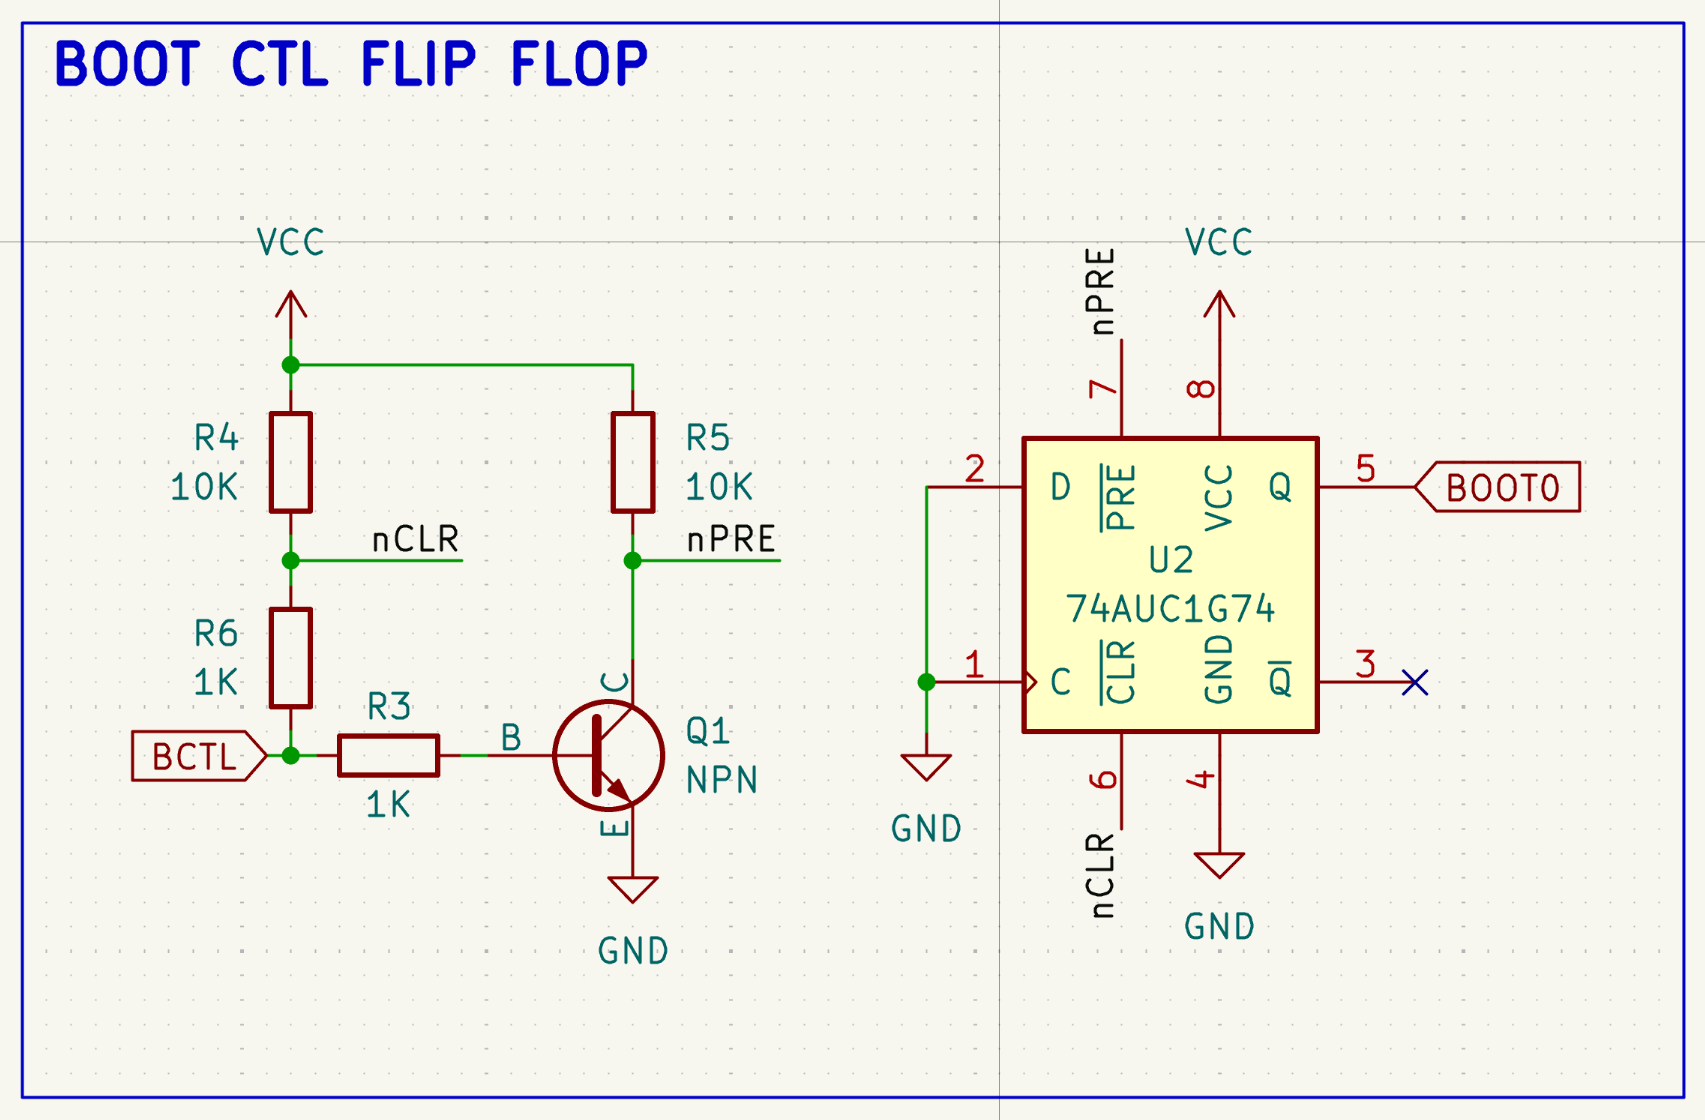
How it works:
- The NPN transistor inverts BOOT_CTL to drive /PRE (active-low preset).
- BOOT_CTL drives /CLR (active-low clear) directly through a 1K series resistor.
- When BOOT_CTL = HIGH: transistor ON, /PRE = LOW (active), Q = HIGH (system flash).
- When BOOT_CTL = LOW: transistor OFF, /CLR = LOW (active), Q = LOW (user flash).
- When BOOT_CTL = Hi-Z (during reset): transistor OFF (/PRE inactive via pull-up), /CLR inactive (via pull-up). The flip-flop holds its previous state.
- The two 1K series resistors isolate the transistor base from /CLR, preventing the /CLR pull-up from turning on the transistor during Hi-Z.
Power-on state: The 74AUC1G74 does not have a guaranteed power-on state. An optional 100nF capacitor from /PRE to GND can be added to force Q HIGH on first power-up.
Tested: Not yet verified on hardware. The design is sound in theory but has not been tested. Let me know if you can confirm that it works.
Which to Choose
The RC circuit is simpler (3 passive components, no IC) and has been validated on hardware. It relies on the capacitor holding BOOT0 LOW for ~1ms across a reset, which is well within the margin for software-triggered resets.
The flip-flop circuit is deterministic (no timing dependency) and holds state indefinitely, but requires more components and has not been tested. It may be preferable in designs if you need reliable state retention, e.g. a real product that requires high reliability.
For most use cases though, my personal opinion is the RC circuit is probably reliable enough and simpler / lower cost.
App integration
The tinyboot bootloader is only half the story — to support remote firmware updates, your app has to cooperate with it. This guide walks through what the app needs to do and shows a minimal integration.
What the app is responsible for
- Declare its version so the host can see it via
tinyboot info. - Confirm successful boot so the bootloader stops retrying.
- Poll the transport for
InfoandResetrequests.
That’s it. The bootloader handles everything else — flashing, verification, state transitions, trial boot.
Minimal app
#![no_std]
#![no_main]

// Embed version into the app's binary so tinyboot can find it.
tinyboot_ch32::app::app_version!();

#[qingke_rt::entry]
fn main() -> ! {
    // Your usual peripheral setup.
    let p = ch32_hal::init(Default::default());

    // UART wired the same way as the bootloader's.
    let uart = Uart::new_blocking::<0>(p.USART1, p.PD6, p.PD5, uart_config).unwrap();
    let (tx, rx) = uart.split();

    // Adapt your tx/rx to embedded_io::Read + Write (see examples/ for a sample).
    let mut rx = /* wrap rx */;
    let mut tx = /* wrap tx */;

    // Create the app handle and confirm that this boot succeeded.
    let mut app = tinyboot_ch32::app::new_app(tinyboot_ch32::app::BootCtl::new());
    app.confirm();

    loop {
        // Your app's real work goes here, alongside polling.
        app.poll(&mut rx, &mut tx);
    }
}
See examples/ch32/v003/app/ for a complete example including a transport.rs module that wraps ch32-hal’s Uart in the embedded_io traits plus optional RS-485 DE-pin handling.
app::confirm() — trial boot handshake
The bootloader tracks newly-flashed firmware in a trial state. Every boot in Validating state consumes one trial; when trials run out, the bootloader assumes the app is broken and takes over on the next reset.
app::confirm() tells the bootloader the new firmware is alive. Call it after your app is initialized to the point where you’re confident it’s running correctly — early enough that it always runs on a successful boot, but late enough to catch major initialization failures.
Once called, the app is considered confirmed and will boot normally on every subsequent reset (until the next firmware update starts the cycle again).
If confirm() is never reached (panic, watchdog, init deadlock), the trials get consumed across resets and the bootloader eventually takes back control.
app::poll() — handling bootloader commands
poll() reads a single frame from your transport and handles it. In the app, two commands do something; the rest are rejected with Status::Unsupported:
| Command | Behavior in app |
|---|---|
Info | Responds with capacity, erase size, boot + app versions, mode = 1 (app mode). |
Reset | Resets the device. addr = 1 reboots into the bootloader; addr = 0 reboots into the app. |
This is enough for the host CLI to do tinyboot info and tinyboot reset --bootloader while the app is running, which is how remote updates get kicked off — see the remote updates guide.
Because poll() is blocking on a read, a typical app runs it in a dedicated task or a loop iteration alongside its other work. For timing-sensitive apps, consider running the transport on an interrupt-driven reader and feeding poll() asynchronously; poll() itself is CPU-cheap.
UART sharing notes
The bootloader and app normally share the same USART. A few gotchas:
- Matching config — the app’s baud rate, pins, and DE polarity must match the bootloader’s. See transports.md.
- DE pin polarity — on boards where RS-485 transceiver contention is possible (e.g. some OpenServoCore V006 layouts), use a
tx_levelthat leaves the bus driver disabled when idle, so the host’s TX line can reach MCU_RX. - Half-duplex flush — when sending multi-byte responses on half-duplex, make sure your
embedded_io::Writeimplementation flushes the UART before releasing DE.
Passing peripherals to poll()
poll() takes your transport as split rx/tx types implementing embedded_io::Read and embedded_io::Write. This lets your app keep full ownership of peripheral initialization — tinyboot doesn’t take over USART registers, and you can layer extra features (logging, RTU framing) on top of the same UART if you adapt them correctly.
BootCtl in the app
BootCtl::new() takes the same arguments in the app as it does in the bootloader — for CH32V003 / V00x that’s BootCtl::new(), for CH32V103 in system-flash mode it’s BootCtl::new(pin, level, delay). The app needs this so that Reset with the BOOTLOADER flag can set the run-mode marker before resetting.
Remote firmware updates
Once the bootloader is in system flash and your app calls poll() + confirm(), you can update the firmware over the same UART / RS-485 bus the device uses for normal operation. No probe, no reset button, no shell to open.
This guide covers the end-to-end flow.
The short version
# Ask the running app to reboot into the bootloader.
tinyboot reset --bootloader

# Flash the new app and jump straight into it after verify.
tinyboot flash new-firmware.elf --reset
That’s it. Everything below is what’s happening under the hood.
The lifecycle
power-on
   │
   ▼
bootloader starts                   META.state
   │                                   │
   ├─ META.state == Idle ──► validate app image ──► hand off to app
   │                                     │
   │                                     └─► (CRC mismatch) stay in bootloader
   │
   ├─ META.state == Validating ──► consume 1 trial, boot app
   │                                     │
   │                                     └─► (no trials left) stay in bootloader
   │
   └─ META.state == Updating ──► stay in bootloader (prior update interrupted)

app starts
   │
   ├─ app::confirm() ──► META.state → Idle (keeps current checksum)
   │
   └─ app::poll():
        ├─ Info  ──► respond with capacity, versions, mode=1
        └─ Reset ──► if flag & BOOTLOADER: mark run_mode = Service, reset
Step 1: enter service mode
When the user kicks off an update, the host sends Reset with the BOOTLOADER flag set. The app sees it through poll(), writes the “enter bootloader” intent to the BootCtl marker (either a RAM word, BKP register, or BOOT_CTL GPIO depending on the chip), and issues a software reset.
The bootloader starts, reads the marker, and — instead of handing off to the app — goes into service mode and listens on the transport.
tinyboot reset --bootloader
# device reboots
tinyboot info     # now reports mode=0 (bootloader)
Step 2: flash
tinyboot flash drives the four-phase protocol:
- Erase the app region (
META.state→Updating). - Write the image in 64-byte pages, with
WriteFlags::FLUSHon the final write. - Verify — the device CRC16s the image, stores the checksum and size in META, and transitions to
Validating. - Reset (if
--resetwas passed) — boot the new app for the first time.
On the first boot under Validating, the bootloader consumes one trial and hands off. If the app reaches confirm(), META transitions to Idle — the update is complete. If the app never confirms (panic, deadlock, bad init), trials get consumed until the bootloader takes back control.
Trial boot behavior
The trial counter is stored as a byte in META. Each power-on in Validating state clears one bit of that byte (a forward-only operation — no erase needed), then boots the app. If the byte reaches zero before confirm() lands, the bootloader treats the app as broken and stays in service mode.
This gives you a safety net: a firmware that hangs during init won’t brick the device, because the bootloader will reclaim control after the trials run out.
Probe-flashed apps (development escape hatch)
The “validate app image” step in the lifecycle has two paths. When a CRC is stored in META (the normal post-Verify case), validation runs the CRC. When META is virgin — no update has ever completed through tinyboot — it falls back to a simpler check so an app flashed directly via SWD / JTAG still boots. This lets you iterate on app firmware with a probe without invoking the protocol every time.
All of the following must be true for this path to trigger:
- Run mode is not Service. No pending “reboot into bootloader” request from the app.
- META state is Idle (
0xFF). No update is in progress and none has gone through Verify. - META checksum is
0xFFFF. No CRC has ever been written (freshly-erased META, or a chip that hasn’t seen a full tinyboot update yet). - App region is non-empty. The first 32-bit word of the app region is not
0xFFFF_FFFF.
When all four hold, the bootloader hands off to the app. As soon as you run a real tinyboot update cycle (Erase / Write / Verify), META gets a stored checksum and subsequent boots fall back to the normal CRC-validation path.
What happens if something goes wrong
| Scenario | Outcome |
|---|---|
| Power lost during erase or write | META.state = Updating, app is invalid. Bootloader stays in service mode on restart. |
Verify returns CrcMismatch | META stays in Updating. Retry or check troubleshooting. |
| App panics during init after flash | Trials run out across reboots; bootloader reclaims control. |
App’s confirm() never reaches due to bug | Same as above — trials run out, bootloader wins. |
| Host crashes mid-flash | Same as “power lost during erase or write” — safe, just re-flash. |
Making it automatic
Any host logic that can speak the tinyboot CLI can drive updates:
# from a script
tinyboot reset --bootloader
sleep 0.5
tinyboot flash "$FIRMWARE" --reset
tinyboot info
If you’re embedding the update flow into a bigger tool, look at the tinyboot crate (the CLI) as a starting point — the flash logic there calls into tinyboot-protocol directly and can be reused as a library.
Building your bootloader from an example
The examples/ directory holds complete, buildable boot + app projects for each supported chip series. They double as CI test targets, which is why they look more structured than a typical example — but they’re also the fastest way to start your own project: copy the one that matches your chip and trim it down.
This page walks through what’s in an example, what you need to change, and what you can delete.
What’s in examples/
examples/ch32/
  v003/      CH32V003 (1920 B system flash, 16 KB user flash)
  v00x/      CH32V00x (V002 / V004 / V005 / V006 / V007)
  v103/      CH32V103 (needs BOOT_CTL circuit for system-flash mode)
Each series directory is a Cargo workspace with two members:
v003/
  Cargo.toml        workspace
  boot/             bootloader binary
    Cargo.toml
    build.rs        picks the right memory.x for the selected flash mode
    memory_x/
      system-flash.x
      user-flash.x
    src/main.rs
  app/              demo app binary
    Cargo.toml
    build.rs
    memory_x/
    src/main.rs
  rust-toolchain.toml
  riscv32ec-unknown-none-elf.json   (V003 / V00x only — custom target)
Why are there so many feature flags?
The example workspaces are built across a CI matrix: multiple chip variants × system-flash / user-flash modes. Features like ch32v003f4p6, system-flash, user-flash exist so CI can re-use the same source tree for every combination.
For your own project, you don’t need any of that. Pick one variant and one flash mode; pin them as defaults in your boot crate’s Cargo.toml; delete the rest.
Starting your own project from an example
- Copy the example that matches your chip (e.g.
examples/ch32/v003/) to a new directory. - In the
boot/Cargo.toml, remove the extra variant features you don’t need. Leave one, set as the default. - Pick a flash mode. Delete the
memory_x/file you don’t need, and simplifybuild.rsto just copy the remaining one. - In
src/main.rs, change the UART config (pins, baud, duplex, tx_en) to match your board. - Do the same for
app/— match the UART config, adjust your pins.
That gives you a minimal, single-purpose workspace with none of the CI scaffolding.
Using tinyboot-ch32 from crates.io
The examples depend on tinyboot-ch32 via a path reference (path = "../../../../ch32") because they live in this repo. For an external project, switch to a git dependency:
[dependencies]
tinyboot-ch32 = { git = "https://github.com/OpenServoCore/tinyboot", tag = "v0.4.0", default-features = false, features = ["ch32v003f4p6", "system-flash"] }
tinyboot-ch32-rt = "0.4"
tinyboot-ch32 is git-only until upstream ch32-metapac publishes the flash driver it depends on. See the tinyboot-ch32 README for details.
memory.x and the linker region contract
Every tinyboot memory.x defines the same five regions: CODE, BOOT, APP, META, RAM. The linker scripts shipped by tinyboot-core derive all the chip-agnostic symbols (__tb_*) from those regions — you don’t need to poke at magic addresses. See the porting guide for the contract.
If you change variants (e.g. V003F4P6 → V003A4M6), the defaults in memory.x are usually fine — you only need to adjust if your part has non-standard RAM / flash sizes.
build.rs and linker scripts
The build.rs job is to make your memory.x discoverable to the linker and to pull in the tinyboot linker fragments via -T flags. A minimal single-mode bootloader build.rs looks like this:
fn main() {
    let out_dir = std::env::var("OUT_DIR").unwrap();
    std::fs::copy("memory.x", format!("{out_dir}/memory.x")).unwrap();

    println!("cargo:rustc-link-search={out_dir}");
    println!("cargo:rerun-if-changed=memory.x");

    println!("cargo:rustc-link-arg=-Ttb-boot.x");
    println!("cargo:rustc-link-arg=-Ttb-run-mode.x");
}
For the app crate, swap -Ttb-boot.x for -Ttb-app.x. The rest is identical.
The example build.rs files in this repo look more involved because they read CARGO_FEATURE_SYSTEM_FLASH / CARGO_FEATURE_USER_FLASH to pick between memory_x/system-flash.x and memory_x/user-flash.x — that’s only needed if you want a single crate that builds both modes. A user project typically picks one mode and keeps a flat memory.x at the crate root.
Linker scripts
| Script | Shipped by | For | When to include |
|---|---|---|---|
memory.x | you | Both | Always. Defines the five regions (CODE, BOOT, APP, META, RAM). |
tb-boot.x | tinyboot-core | Bootloader | Always, in the bootloader binary. Derives __tb_* symbols from memory.x and places the boot version tag. |
tb-app.x | tinyboot-core | App | Always, in the app binary. Derives __tb_* symbols and places the app version tag last in flash. |
tb-run-mode.x | tinyboot-ch32 | Both | When the platform uses a RAM magic word for run-mode persistence (the default on V003 / V00x / V103). Reserves __tb_run_mode at ORIGIN(RAM) + LENGTH(RAM) — your memory.x must size RAM to leave 4 bytes free at the top (LENGTH = <ram_size> - 4). |
split-sysflash.x | tinyboot-ch32 | Bootloader | Only on V103 in system-flash mode. Places .text2 overflow code into the secondary system-flash region (CODE2 / BOOT2). See flash modes for the V103 split layout. |
All tb-*.x scripts are added via cargo:rustc-link-arg=-T<name>.x in build.rs. The shipping crates put them on the linker search path automatically as part of their own build scripts, so you only need the -T flags.
Porting to a new MCU family
Adding a new chip series within an existing family (e.g. V00x alongside V003 in the CH32 family) is covered in Adding a new chip series.
Porting to an entirely new MCU family (e.g. STM32) requires a parallel crate. The core crates (tinyboot-core, tinyboot-protocol, tinyboot) are platform-agnostic — you implement four traits and provide a minimal HAL. Here’s what that looks like.
1. Create a tinyboot-{chip} crate
Mirror the layout of tinyboot-ch32:
src/hal/— low-level register access: flash (unlock/erase/write/lock), GPIO (configure, set level), USART (init, blocking read/write/flush), RCC (enable peripherals), reset (system reset + optional jump).src/platform/— implementations of the fourtinyboot_core::traitson top of the HAL.src/boot.rsandsrc/app.rs— thin bootloader and app entry points exposing the platform to user binaries.
The four traits
| Trait | What to implement |
|---|---|
Transport | Any embedded_io::Read + Write stream — UART, RS-485, USB, SPI, even WiFi or Bluetooth. The protocol doesn’t care what carries the bytes |
Storage | embedded_storage::NorFlash (erase, write, read), plus as_slice() for zero-copy flash reads |
BootMetaStore | Read/write boot state, trial counter, app checksum, and app size from a reserved flash page (address from linker symbol) |
BootCtl | run_mode()/set_run_mode() for Service/HandOff intent across reset, reset() for software reset, hand_off() to boot the app |
2. (Optional) Create a tinyboot-{chip}-rt crate
If your chip needs a custom _start + linker script to fit a small bootloader — tinyboot-ch32-rt exists for this reason on CH32 — ship one alongside. Otherwise the regular chip runtime is fine for the app.
3. Create an example workspace
Add examples/{family}/{series}/ with boot + app binaries. Each provides a memory.x defining the five standard regions (CODE, BOOT, APP, META, RAM). The core linker scripts (tb-boot.x, tb-app.x, tb-run-mode.x) handle the rest.
Linker region contract
All memory.x files define five standard regions. The crate linker scripts (tb-boot.x, tb-app.x) derive all __tb_* symbols from these regions — no magic addresses in memory.x.
| Region | Description |
|---|---|
CODE | Execution mirror (VMA) of the binary’s flash region |
BOOT | Bootloader physical flash |
APP | Application physical flash |
META | Boot metadata (last flash page) |
RAM | SRAM |
What you get for free
The entire protocol (frame format, CRC, sync, commands), the boot state machine (Idle / Updating / Validating transitions, trial boot logic, app validation), the CLI, and the host-side flashing workflow all work unchanged. You only write the chip-specific glue.
Before starting a port
Please open an issue so we can discuss the approach. Some families have surprises (boot-pin muxing, flash write granularity, clock domain quirks) that we’ve already run into on CH32 and can share context on.
Adding a new chip series
This guide covers adding a new chip series within an existing family (e.g. adding the V00x series alongside V003 in the CH32 family). A new series typically has different peripheral versions and may require new HAL implementation files.
If you’re porting to an entirely new MCU family (e.g. STM32), see Porting to a new MCU family instead.
Terminology
| Term | Example | Scope |
|---|---|---|
| Family | CH32, STM32 | One tinyboot-{family} crate |
| Series | V003, V00x, V103 | Chips sharing peripheral register layouts |
| Variant | CH32V003F4P6, CH32V006X8X6 | A specific chip (package, flash/RAM size) |
Quick orientation
The series-specific pieces in tinyboot are:
| What | Where | Purpose |
|---|---|---|
| Feature flags | ch32/Cargo.toml | Selects the right ch32-metapac register definitions |
| Compile-error guard | ch32/src/lib.rs | Ensures exactly one variant is selected |
| HAL modules | ch32/src/hal/{flash,rcc,afio}/ | Series-level register access, routed by cfg |
build.rs | ch32/build.rs | Auto-detects peripheral versions from metapac metadata |
| Memory layouts | examples/ch32/{series}/{boot,app}/memory_x/ | Linker scripts with flash/RAM sizes from the datasheet |
| Example Cargo features | examples/ch32/{series}/{boot,app}/Cargo.toml | Wire feature flags through to tinyboot-ch32 |
Step 1: Add feature flags
In ch32/Cargo.toml, add a feature for each variant in the new series:
[features]
# ... existing variants ...
ch32v006x8x6 = ["ch32-metapac/ch32v006x8x6"]
ch32v007x8x6 = ["ch32-metapac/ch32v007x8x6"]
Then add them to the compile-error guard in ch32/src/lib.rs:
#![allow(unused)]
fn main() {
#[cfg(not(any(
    // ... existing variants ...
    feature = "ch32v006x8x6",
    feature = "ch32v007x8x6",
)))]
compile_error!("No chip variant selected. ...");
}
Step 2: Check HAL compatibility
The build.rs reads peripheral metadata from ch32-metapac and emits cfg flags like flash_v0, rcc_v00x, afio_v0, etc. To see which versions your new series gets, run a verbose build from the ch32/ directory:
cargo build --features ch32v006x8x6 -vv 2>&1 | grep 'cargo:cfgs='
This prints a line like cargo:cfgs=flash_v00x,rcc_v00x,afio_v0,... — compare it against an existing series to see what differs.
If every peripheral version already has a HAL implementation, no changes are needed — the existing cfg_attr routing handles it.
If the metapac reports a new version (e.g. flash_v00x), you’ll need to:
- Create a new implementation file (e.g.
ch32/src/hal/flash/v00x.rs) — copy the nearest existing version and adapt register access. - Add a
cfg_attrline to the module’smod.rs:
#![allow(unused)]
fn main() {
// ch32/src/hal/flash/mod.rs
#[cfg_attr(flash_v0, path = "v0.rs")]
#[cfg_attr(flash_v00x, path = "v00x.rs")]   // new
#[cfg_attr(flash_v1, path = "v1.rs")]
mod family;
}
Repeat for rcc/ and afio/ if their versions differ too.
Boot mode selection
The flash controller version also determines how the bootloader selects its flash region and persists run-mode across resets. The build.rs derives this automatically from the boot_pin flag (which itself comes from the flash version):
Register-based (flash_v0, flash_v00x — e.g. V003, V00x): The flash controller has a BOOT_MODE register that indicates which flash region the chip booted from. When system-flash is enabled, run_mode is read directly from this register (run_mode_mode), and the boot source is latched by writing BOOT_MODE before reset (boot_src_mode). No external hardware needed.
Pin-based (flash_v1 — e.g. V103): The chip samples hardware BOOT0/BOOT1 pins at reset to choose the flash region. Run-mode is persisted as a magic word in RAM instead (run_mode_ram), and boot source is controlled by driving a GPIO connected to an external RC/flip-flop circuit on the BOOT0 pin (boot_src_gpio). The BootCtl::new() constructor takes pin, level, and delay parameters for this.
The build.rs also emits split_sysflash for pin-based chips with system-flash enabled, because the system flash on these chips is split into two regions by option bytes — flash HAL functions are placed in a second section (.text2) to fit.
If the new series introduces a flash controller version that doesn’t fit either pattern, you’ll need to add new run_mode and boot_src implementations under ch32/src/platform/boot_ctl/ and update the build.rs logic accordingly.
Step 3: Write the memory layout
Look up each variant’s datasheet for:
- User flash base address, total size, and page size
- System flash base address and layout (if system-flash boot is supported)
- RAM base address and size
Create a memory.x linker script for each flash mode. When variants in the series have different flash/RAM sizes, each variant gets its own memory.x directory (see Step 4).
For example, CH32V002 (16K flash, 4K RAM, 256-byte pages):
/* user-flash.x */
MEMORY
{
    RAM  : ORIGIN = 0x20000000, LENGTH = 4K - 4
    CODE : ORIGIN = 0x00000000, LENGTH = 2K
    BOOT : ORIGIN = 0x08000000, LENGTH = 2K
    APP  : ORIGIN = 0x08000000 + 2K, LENGTH = 14K - 256
    META : ORIGIN = 0x08000000 + 16K - 256, LENGTH = 256
}
Versus CH32V006 (62K flash, 8K RAM, 256-byte pages):
/* user-flash.x */
MEMORY
{
    RAM  : ORIGIN = 0x20000000, LENGTH = 8K - 4
    CODE : ORIGIN = 0x00000000, LENGTH = 2K
    BOOT : ORIGIN = 0x08000000, LENGTH = 2K
    APP  : ORIGIN = 0x08000000 + 2K, LENGTH = 60K - 256
    META : ORIGIN = 0x08000000 + 62K - 256, LENGTH = 256
}
The META region must be exactly one flash page, placed at the end of flash. RAM reserves 4 bytes at the top for the __tb_run_mode word — this is needed for all user-flash builds, as well as system-flash on pin-based chips (where run-mode is persisted in RAM rather than the BOOT_MODE register).
Step 4: Add the example
Each variant gets its own memory.x directory. The build.rs selects by variant feature:
examples/ch32/v00x/
├── boot/
│   ├── memory_x/
│   │   ├── ch32v002x4x6/
│   │   │   ├── system-flash.x
│   │   │   └── user-flash.x
│   │   └── ch32v006x8x6/
│   │       ├── system-flash.x
│   │       └── user-flash.x
│   ├── build.rs
│   └── Cargo.toml
└── app/
    └── (same structure)
The build.rs looks up the active variant:
const CHIPS: &[&str] = &["ch32v002x4x6", "ch32v006x8x6"];

fn main() {
    // ... flash mode selection ...

    let chip = CHIPS
        .iter()
        .find(|c| cfg_has(&format!("CARGO_FEATURE_{}", c.to_uppercase())))
        .expect("No chip variant selected");

    let src = format!("{manifest_dir}/memory_x/{chip}/{flash_mode}.x");
    // ...
}
Add each variant to the CHIPS array in build.rs, create its memory_x/ subdirectory, and add the features to Cargo.toml.
Step 5: Build and test
Build both flash modes:
cd examples/ch32/v00x

# user-flash
cargo build -p boot --features ch32v006x8x6,user-flash --no-default-features
cargo build -p app  --features ch32v006x8x6,user-flash --no-default-features

# system-flash
cargo build -p boot --features ch32v006x8x6,system-flash --no-default-features
cargo build -p app  --features ch32v006x8x6,system-flash --no-default-features
Then flash to hardware using wlink and walk through the standard test sequence for both flash modes. The two modes exercise different boot-mode selection paths (see Boot mode selection above), so testing only one can miss issues in the other.
Step 6: Update CI
Add the new series to .github/workflows/ci.yml. Each series has its own job with a matrix of variants. The CI runs cargo fmt, cargo clippy, and cargo build --release for both system-flash and user-flash modes on every variant. This ensures formatting, lint, compilation, and that the bootloader fits within the system flash region.
Add a new job following the pattern of the existing series jobs. Use the V003 job as a template for custom-target chips (nightly + -Zbuild-std) or the V103 job for standard-target chips (stable + rustup target add).
strategy:
  matrix:
    chip: [ch32v006x8x6, ch32v007x8x6]
Step 7: Update documentation
- Add the new series to the flash modes table with its system/user flash sizes.
- Add an entry under examples describing the new series directory.
- If the series introduces new boot-mode selection behavior, transports, or other concepts not covered by existing docs, add or update the relevant handbook pages.
Checklist
- Feature flags added to
ch32/Cargo.tomlfor each variant - Variants added to compile-error guard in
ch32/src/lib.rs - HAL compiles (new
v*.rsfiles if peripheral versions differ) -
memory.xfor each variant and flash mode, with correct sizes from datasheet - Features wired through in example
boot/Cargo.tomlandapp/Cargo.toml - Example
build.rslists all variants inCHIPSarray - Builds for both
system-flashanduser-flashmodes - CI job added for the new series in
.github/workflows/ci.yml - Documentation updated (flash modes table, examples page, any new concepts)
- Tested on hardware
Design notes
Why tinyboot exists, how it fits in the CH32V003’s 1920-byte system flash, and what unsafe it uses.
Motivation
tinyboot was built for OpenServoCore, where CH32V006-based servo boards need seamless firmware updates over the existing DXL TTL bus — no opening the shell, no debug probe, just flash over the same wire the servos already talk on.
The existing options didn’t fit:
- CH32 factory bootloader — Fixed to 115200 baud on PD5/PD6 with no way to configure UART pins, baud rate, or TX-enable for RS-485. Uses a sum-mod-256 checksum that silently drops bad commands with no error response. No CRC verification, no trial boot, no boot state machine. See ch32v003-bootloader-docs for the reverse-engineered protocol details.
- embassy-boot — A well-designed bootloader, but requires ~8KB of flash. That’s half the V003’s 16KB user flash, and doesn’t fit in system flash at all. Not practical for MCUs with 16-32KB total.
I took it as a challenge to fit a proper bootloader — with a real protocol, CRC16 validation, trial boot, and configurable transport — into the CH32V003’s 1920-byte system flash. The key inspiration was rv003usb by cnlohr, whose software USB implementation includes a 1920-byte bootloader in system flash. That project proved it was possible to fit meaningful code in that space, and showed me that the entire 16KB of user flash could be left free for the application.
Design approach
tinyboot is structured as a library, not a monolithic binary. The core logic and protocol live in platform-agnostic crates; chip-specific details live in a single tinyboot-{chip} crate (tinyboot-ch32 for CH32) with a boot module for bootloader binaries and an app module for applications.
To build your bootloader, you create a small crate with a main.rs that wires up your transport and calls boot::run() — see the examples for exactly this. The app module plugs into your application so it can confirm a successful boot and reboot into the bootloader on command, enabling fully remote firmware updates without physical access.
How it fits in 1920 bytes
Beyond the usual Cargo profile tricks (opt-level = "z", LTO, codegen-units = 1, panic = "abort"), fitting a real bootloader in 1920 bytes required more deliberate choices:
- No HAL crates — bare metal register access via PAC crates only; HAL abstractions are too expensive for this budget.
- Custom runtime —
tinyboot-ch32-rtreplacesqingke-rtin the bootloader; its startup is just GP/SP init and a jump to main (20 bytes of assembly instead of ~1.4KB of full runtime). - Symmetric frame format — the same
Framestruct is used for both requests and responses with one shared parse and format path, eliminating code duplication. repr(C)frame with union data — CRC is computed directly over the struct memory via pointer cast; no serialization step, no intermediate buffer.MaybeUninitframe buffer — the 76-byteFramestruct is reused every iteration without zero-initialization.- Bit-bang CRC16 — no lookup table, trades speed for ~512 bytes of flash savings.
- Bit-clear state transitions — forward state changes (Idle → Updating, trial consumption) flip 1→0 bits without erasing, avoiding a full erase + rewrite cycle.
- Avoid
memset/memcpy— these pull in expensivecoreroutines; manual byte loops and volatile writes keep the linker from dragging in library code. .write()over.modify()— register writes use direct writes instead of read-modify-write, saving the read and mask operations.- Aggressive code deduplication — shared flash operation primitives across erase and write (see the flash HAL).
Safety
The crates use unsafe in targeted places, primarily to meet the extreme size constraints of system flash (1920 bytes):
repr(C)unions andMaybeUninit— zero-copy frame access and avoiding zero-initialization overhead.read_volatile/write_volatile— direct flash reads / writes, version reads, and boot request flag access.transmute— enum conversions (boot state) and function pointer cast for jump-to-address.from_raw_parts— zero-copy flash slice access in the storage layer.- Linker section attributes — placing version data and boot metadata at fixed flash addresses.
export_name/extern "C"— runtime entry points and linker symbol access for chip runtime integration.
These are deliberate trade-offs — safe alternatives would pull in extra code that doesn’t fit. The unsafe is confined to data layout, memory access, and hardware boundaries; the bootloader state machine and protocol logic are safe Rust.
Troubleshooting
Common symptoms and their usual causes. If you hit something not covered here, please open an issue.
Note
This page is a skeleton. Each section lists the likely causes and fixes at a high level; the detailed step-by-step is being re-validated and will land in a follow-up pass.
tinyboot flash fails at Verify with CrcMismatch
The image reached the device but the CRC over flash didn’t match. Common causes:
WriteFlags::FLUSHwas not set on the final write of a contiguous region.- A write payload was not padded to a 4-byte boundary.
- The host skipped an address gap without flushing the previous region first.
If you’re using the shipped tinyboot CLI, the above are handled for you. If you’ve written a custom host tool, re-check those three rules against the protocol reference.
Device does not respond to tinyboot info
Something in the UART chain isn’t right. Work through these in order:
- Baud rate — host and device must match. CLI default is 115200.
- Pins — the bootloader
UsartMappingmust match how your UART is wired (and, for the app, the pins passed toUart::new_blocking). rx_pull— floating RX lines needPull::Up; externally pulled-up lines should usePull::None.- RS-485 / DXL TTL — a DE/RE pin must be configured via
TxEnConfig, withtx_levelmatching the transceiver’s DE polarity. - Half-duplex contention — on some boards the programmer’s TX driver and the MCU’s TX driver both reach MCU_RX. Flipping
tx_level(so the MCU’s side is tri-stated while idle) often resolves it. See the transports guide.
Bootloader changes don’t take effect after wlink flash
After writing to system flash on some chips, a full power cycle is required before the new bootloader runs. A software reset or re-attach is not enough.
- Toggle VCC, or use
wlink set-power disable3v3followed bywlink set-power enable3v3.
CH32V103 won’t boot / the debugger can’t attach
The option bytes may be corrupted or the debug interface may be held off by the running firmware. Recovery path:
- Hold BOOT0 and BOOT1 both HIGH during a reset to force SRAM boot.
- With the chip still held in SRAM boot, run
wlink unprotectto clear the read / write protection on the option bytes. - Release BOOT0 / BOOT1 and power-cycle.
wlinkcan then reflash normally.
wchisp can’t enter boot mode
wchisp drives the factory UART ISP, which lives in system flash. A few reasons it might fail:
- You’re in system-flash mode — tinyboot has overwritten the factory ISP, so
wchisphas nothing to talk to. Usewlinkover SWIO instead, or reflash a factory image to system flash fromvendor/first. - CH32V103 — entry needs BOOT0 HIGH plus BOOT1 LOW (PB2 LOW) at reset.
- CH32V003 / V00x — no hardware entry condition; the factory ISP is normally reached via a software stub that jumps to it. In practice, use
wlinkfor anything outside of a fresh-chip ISP workflow.
wlink erase didn’t wipe the bootloader
wlink erase only targets the user flash region. Bootloaders living in system flash (CH32V003 / V00x / V103 default in this repo) are untouched.
- To fully reset:
wlink eraseto wipe user flash, then re-flash the bootloader to system flash (either your tinyboot build or a factory image fromvendor/), then power-cycle.
App crashes immediately on hand-off from the bootloader (user-flash mode)
This is specific to user-flash mode, where the app lives behind the bootloader in user flash (e.g. at 0x08000800) rather than at the start of the mapped execution region. In system-flash mode the app starts at 0x08000000 which is already mapped to 0x0 at reset, so this doesn’t apply.
When the app links against qingke-rt, the runtime hardcodes the trap vector base (mtvec) to 0x0. Behind-a-bootloader apps need the vector to point to their own .trap section instead.
- The example apps work around this via a linker
--wrapflag applied to the relevantqingke-rtsymbol. Copy the wiring fromexamples/ch32/v003/app/when starting your own user-flash-mode app crate.
BOOT0 stays HIGH after a soft reset during a user-flash test
On CH32V103 with the BOOT_CTL RC circuit attached, a soft reset can leave BOOT0 latched HIGH long enough that the chip boots into system flash even in user-flash test mode.
- When testing user-flash-mode tinyboot on a V103 board that has the RC network, temporarily disconnect the PB1 → BOOT0 network.
I bricked my V103 and can’t recover
See the SRAM-boot recovery procedure above — BOOT0 HIGH + BOOT1 HIGH on reset puts the chip in a state where debuggers can attach even if option bytes are corrupted.
Contributions to this page are especially welcome. If you’ve hit and fixed something that isn’t covered, please open a PR.
Contributing
Thanks for your interest in tinyboot. This page covers the dev setup, test procedures, and workflow conventions.
Before starting
- For anything bigger than a typo fix, please open an issue first so we can discuss the approach.
- New chip ports are especially welcome — see the porting guide for the trait surface you’d need to implement.
AI assistance
Parts of this project — including code, tests, and this handbook — were written with AI assistance. We’re open about that, and AI-assisted contributions from others are welcome under the same ground rules we hold ourselves to:
- AI-assisted code, tests, and documentation are accepted — but disclose it. If an AI assistant helped produce your contribution, say so in the PR description. A one-liner is enough. No need to itemize what came from where.
- You are the decision maker. Architecture, design, code quality, and correctness are your calls, not the AI’s. Don’t hand off judgment.
- You own the code, not the AI. Use your best judgment before submitting — if you wouldn’t be comfortable putting your name on it, don’t send it.
- Test on real hardware. No “it compiles” submissions for anything that touches flash, peripherals, or the boot path. Run the hardware validation checklist where it applies.
- Keep core features in system flash. The bootloader has to fit in the system-flash budget (see design notes). Non-core features can be
cfg-gated if they don’t fit for everyone. - Slop PRs will be rejected. AI-generated or not, PRs that show no sign of human review — unused code, wrong abstractions, duplicated logic, tests that don’t exercise the change, docs that hallucinate — will be closed. The policy is about thoughtfulness, not tooling.
Workspace layout
lib/                         platform-agnostic core
  core/                      tinyboot-core
  protocol/                  tinyboot-protocol
ch32/                        CH32 HAL + platform
  rt/                        tinyboot-ch32-rt (minimal bootloader runtime)
cli/                         tinyboot host CLI
examples/ch32/v003/          V003 boot + app (CI testbed)
examples/ch32/v00x/          V00x boot + app
examples/ch32/v103/          V103 boot + app
docs/                        user-facing documentation
Each directory is its own Cargo workspace with an independent Cargo.lock. A “clean compile” of the project therefore means wiping target/ under every workspace — see below.
Rust toolchain
- Library crates (
lib/,cli/) — stable Rust 1.85+, edition 2024. - CH32 example binaries — nightly, for
-Zbuild-stdonriscv32ec-unknown-none-elf(V003 / V00x) or the stableriscv32imc-unknown-none-elftarget (V103).
Each example workspace pins its toolchain via rust-toolchain.toml.
Running tests
# Unit tests for the platform-agnostic crates
cd lib && cargo test

# Build every example to make sure all feature combinations compile
cd examples/ch32/v003 && cargo build --release
cd examples/ch32/v00x && cargo build --release
cd examples/ch32/v103 && cargo build --release

# Host CLI
cd cli && cargo test
CI runs a matrix across chip variants and flash modes. Match that before opening a PR.
Clean compile
When hunting size regressions or build issues, a “clean compile” means removing target/ from every workspace. A leftover target/ in one workspace can mask issues in another:
find . -type d -name target -prune -exec rm -rf {} +
Then rebuild the affected workspaces.
Hardware validation
Some changes (particularly to flash, BootCtl, or the RS-485 transport) can’t be caught by unit tests and need on-hardware validation.
Integration test checklist (user-flash mode)
This is the acceptance test we run before merging flash-touching changes on CH32V003 / V103 in user-flash mode:
- Erase user flash via
wlink. - Build and flash the bootloader to the
BOOTregion. - Power-cycle the board.
- Confirm
tinyboot inforeportsmode = 0and the expectedboot_version. - Build the app.
- Flash the app via
tinyboot flash <app> --reset. - Confirm the app is running (LED blinks,
tinyboot inforeportsmode = 1). - Re-flash a different app version to exercise the update flow end-to-end.
- Trigger bootloader re-entry via
tinyboot reset --bootloader. - Re-flash the original app, confirm it still runs.
- Simulate an app that never confirms — boot should fall back to the bootloader after trials run out.
- Simulate a power loss mid-flash (disconnect power during a write); confirm recovery.
- Confirm
METAis in the expected location post-update.
Note
On CH32V103 in user-flash mode with the BOOT_CTL RC network installed, temporarily disconnect the PB1 → BOOT0 trace before running this procedure. A soft reset can otherwise latch BOOT0 HIGH and route you into system flash.
System-flash mode
System-flash validation follows the same shape but uses wlink to write to the system flash address (0x1FFFF000 on V003 / V103, 0x1FFF0000 on V00x). After writing system flash, always power-cycle before testing.
Commit and PR conventions
- Small, focused commits. Commit messages in imperative mood (e.g. “Add V00x feature flag”, “Fix FTPG partial page write”).
- A PR covering a behavior change should note how you validated it (unit test added, hardware procedure run, both).
- Keep docs changes in the same PR as the code change they describe, unless the docs are big enough to deserve their own review.
Releases
Releases are tagged vX.Y.Z across the whole repo — all crates share a version. tinyboot-ch32 stays git-only (not published to crates.io) while it depends on an unreleased ch32-metapac. The rest (tinyboot-core, tinyboot-protocol, tinyboot, tinyboot-ch32-rt) publish to crates.io.